Contents
Exterior HVAC ducts can be found on most large industrial or commercial buildings, extending from air handlers along the rooftops. These ducts can extend up to hundreds of feet to deliver the air required to various parts of the buildings they serve. Because of the exposure to the elements, the insulation that envelopes these ducts stand out as a determining factor in overall building efficiency and safety. If the insulation fails, air handlers must run significantly harder (burning more energy in the process) to deliver conditioned air to the spaces they serve and may be delivering lower quality air in the process.
This blog will examine the various causes of failure in exterior duct insulation and then point out some tips you can use to spot duct insulation that is failing or heading that way.
Duct and Insulation Construction – The Basics
A majority of exterior ducts are wrapped with sheets of fiberglass insulation with an exterior jacket of aluminum wrap, venture clad or some other weather barrier. The seams are then sealed using tape consisting of aluminum and adhesive. This wrap system is placed around the sheet metal ducts that serve as the conduit for conditioned air from the air handler.
These sheet metal ducts are made in sections and are typically rectangular in shape. The end of each section of duct is flanged, and each section butts up against the next and then joined together to connect the ducts. The flanged connection forms a “TDC joint” – short for transverse duct connector. This flange extends 1-5/8” over the baseline duct.
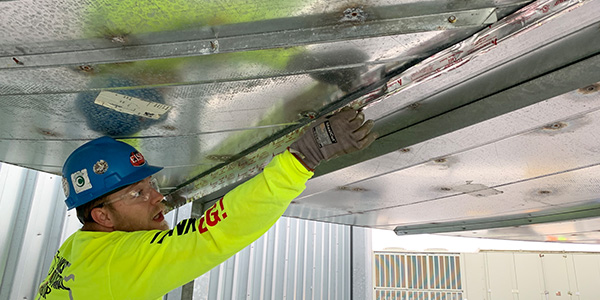
Figure 1 Sheet metal rooftop ducts connect and their TDC flanged joints have mastic tape on each joint.
First Point of Failure – Stepping Where You Shouldn’t
Insulation consists of insulative material and air gaps. Those air gaps must be maintained to keep the insulation’s “R-value” (a linear measure of how well insulation prevents energy transfer) near the specified standard. These gaps trap air and prevent transfer of heat or cold. The first point of failure for wrapped systems occurs from the first day of installation – human impact. Well intentioned installers can compress the insulation they are installing by walking or by setting down tools or other materials on top of finished insulation. No installation is perfect.
Compression can also occur later from snow loads that weigh down the top of ducts. Worse, people transiting your rooftop tend to take shortcuts to save time. Poorly designed rooftops don’t allow safe crossing points through use of safety stairs or ladders. Workers in these situations climb on top of your existing pipes, ducts or anything else in their way, creating safety hazards and destroying your investment in the process.
Water is Insulation’s Biggest Enemy
We discussed the TDC joint in the duct system earlier. No connection in these TDC joints can be perfectly sealed. They naturally leak air as air flows through the duct. The amount leaked depends on the quality of the materials and installation, but this total can be 3-5% of total volume. This leakage makes your air handler work harder and longer to meet the conditioning requirements of your building.
Because the top of these joints are not flush with the surface of the ducts, the amount of insulation over them varies relative to the rest of the duct’s surface. See the diagram below. Generally, the surface of the duct can accommodate more insulation than the top of each joint. The reduced amount of insulation over the top of each joint plus the leaking air combine to allow condensation to occur at the joint.
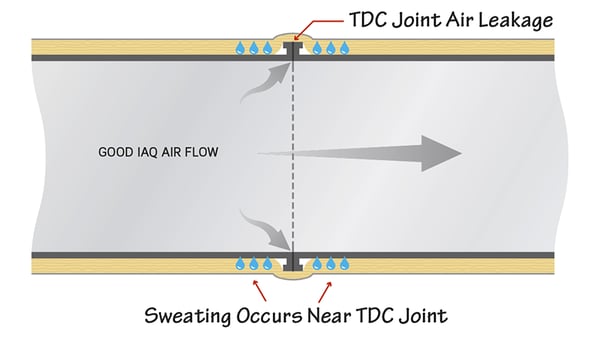
Figure 2 Not enough insulation over TDC joints: they sweat internally.
Condensation creates the first, and most important, condition for the failure of insulation on exterior rooftop ducts. The condensation will, over time, cause the wrapped insulation to absorb water. Because water conducts thermal energy nearly 20 times higher than average insulation, water is deadly to insulation. Water can ultimately kill 80% or more of insulative R-value (R-value measures the ability for heat to conduct through insulation).
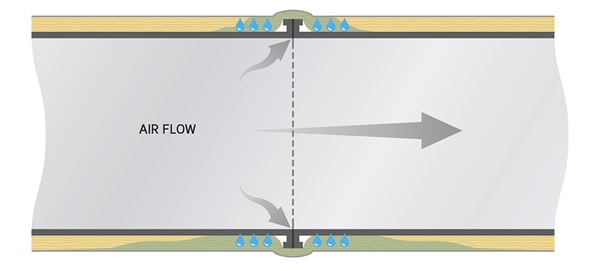
Figure 3 Sweating makes insulation wet!
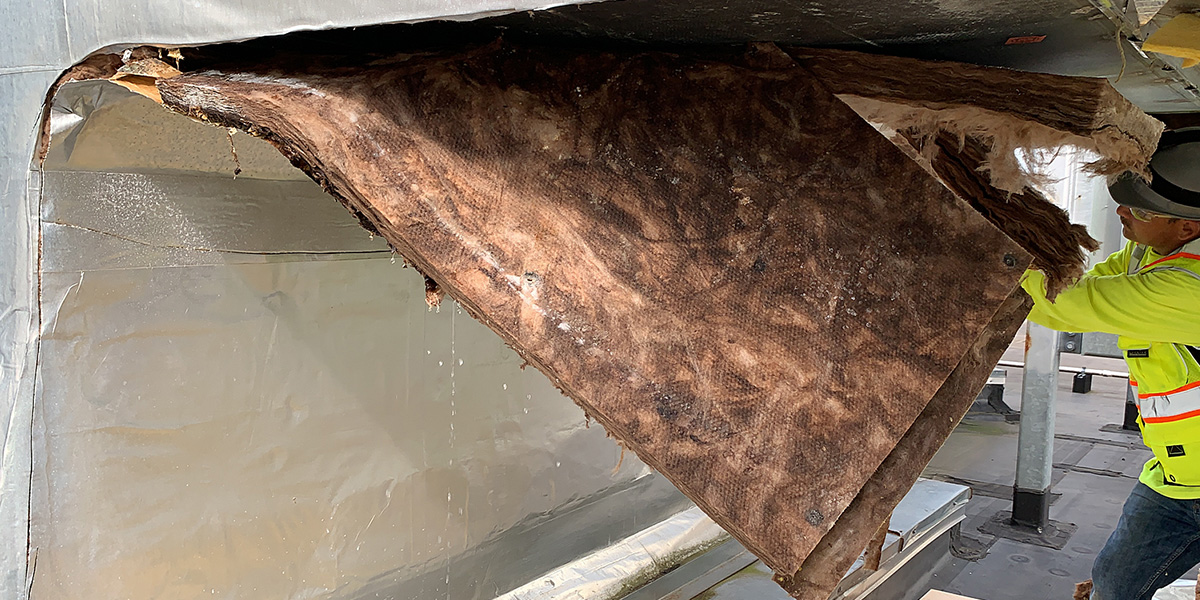
Water’s effects compound on each other. As water is absorbed throughout the wrap, gravity filters it toward the bottom, creating sagging on the bottom of the duct. The sagging creates an air gap on the bottom of the duct and combined with the diminished R-value of the wet insulation, accelerate existing condensation. The wet insulation then becomes very heavy and pulls on the existing edges and seals on the duct, creating small gaps for outside moisture from rain and snow to further penetrate the insulation.
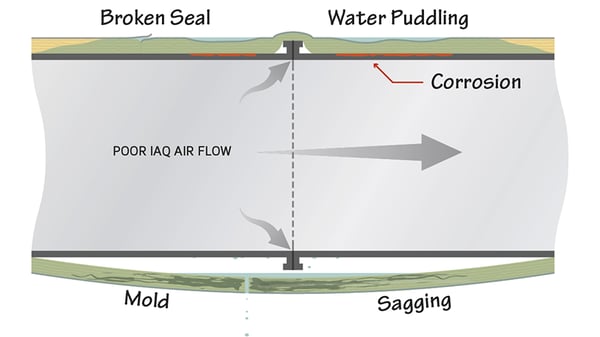
Figure 4 Wet insulation sags, breaks seals at edges, allows moisture infiltration, mold and mildew to form.
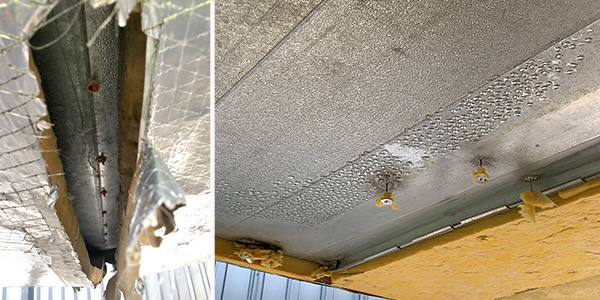
Figure 5 Additional sweating on the bottom of a duct with failed insulation.
What Lurks Within
All of this moisture creates a giant wet blanket, with no exposure to open air or sunlight. Moisture + lack of airflow + no sunlight leads to mold growth and corrosion. That growth can easily penetrate inside of the duct through TDC joints or other holes created during the installation process. Now your ducts become a conduit for bad things to happen. If your facility (such as a hospital, food or pharmaceutical plant) relies on a pristine indoor air quality, this water intrusion can create high risk and untenable working conditions.
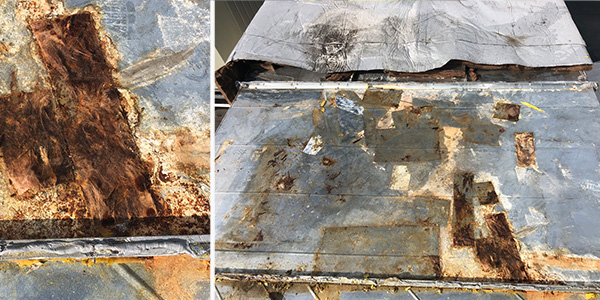
Figure 6 Corrosion and moldy insulation on a duct beneath a failed system.
We have seen wrapped systems fail in as little as three months from condensation or water intrusion, destroying installations that should last for up to ten to fifteen years. We recently replaced an entire system on a building only seven years old (pictures below) with insulation that had clearly been failed for multiple years.
How to Inspect?
We look at three things to assess the health of your exterior duct insulation.
The obvious. First, we look for tell-tale signs of mold like these:
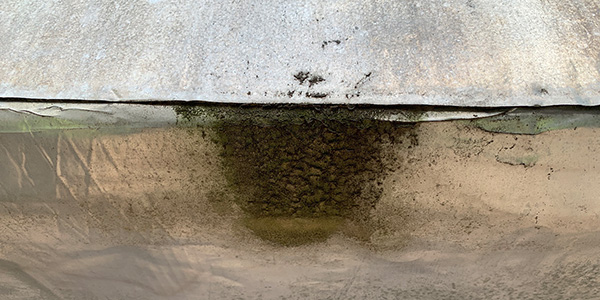
Figure 7 Mold growth at the seam of wrapped insulation.
This photo was taken of a failing system, with mold growth showing on the exterior seams of the installation. If it looks this moldy on the outside, imagine how it looks on the inside!
Check the forest, then the trees. Second, we look for signs of puddling on your ducts. We can do this obviously by looking down at the top of ducts from another vantage point in the building. From afar, we can use commercially available (and free) satellite image services (like Google Earth) to look for dark spots on top of an otherwise clean duct. The puddling shows that the insulation is already significantly compressed and gaps in the seams are more than likely exposed (allowing moisture intrusion). Here’s an example of a satellite image and up-close photo of the same duct. See the “dark spots” on the top of the ducting?
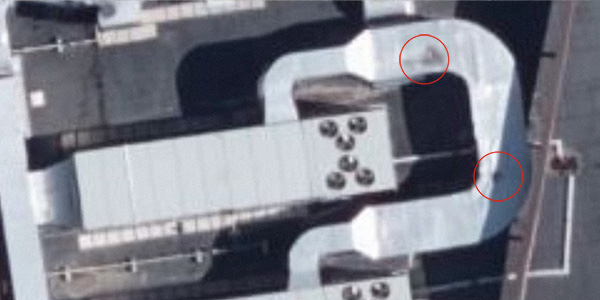
Figure 8 Commercial satellite image of an exterior rooftop duct system. Note the dark spots on top of the right side.
The “up close” photo of the satellite image above shows the puddle (insulation compression) and the exposed seams.
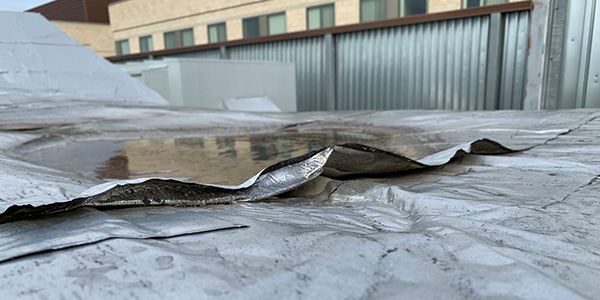
Figure 9 The up close photos of the dark spots on that satellite image. The weight of the puddles creates gaps in the insulation seam, allowing further water intrusion.
Check for saggy diapers. Any of you with babies still in diapers know that saggy diapers are a bad thing. Insulation is no different. Evidence of sagging on the bottom of the duct is a telltale that water is weighing down the insulation on the duct. Here is another photo of the bottom of the same duct:
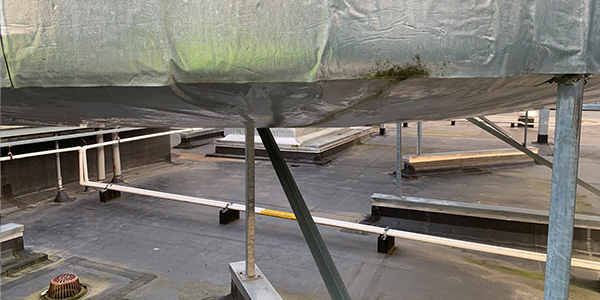
Figure 10 Sagging insulation under a failed unit.
When we cut that duct open here is what we found. Note the water leaking from the insulation that is now brown from mold infestation (the insulation was originally bright yellow).
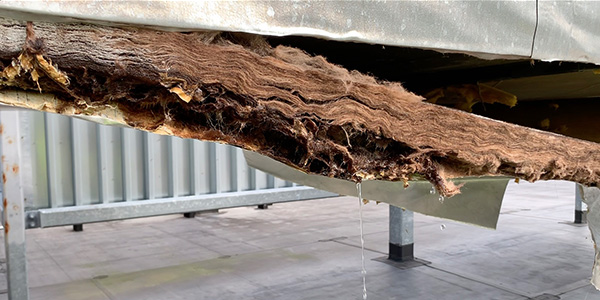
Figure 11 Moldy insulation leaking water under a failed unit.
When you see the sagging, you won’t need to cut the entire bottom off to verify what you might suspect. All you need is a small pen, preferably a sturdy one. Take it and punch a hole in the bottom of the insulation. Water will most likely gush out of the sagging insulation on a failed unit (pro tip: step away from the penetration before pulling the pen out to stay dry!).
The BIG Takeaway:
In the example we showed you, the building was only seven years old at the time we replaced the insulation. All the inspection took was a pen and a few eyeballs from the right vantage point.
If you take nothing else away from this article, leave with this:
- Wet insulation is worse than no insulation
- Water intrusion or condensation will cause 90% of exterior duct insulation failures
- Wrapped insulation systems when not done properly can begin their path to failure from the time of installation
- Inspecting and identifying potential failures is a pretty easy process
Better ways exist to prevent these failures, make your ducts more energy efficient and reduce your total cost of ownership. Companies like ours can help you avoid your facility looking like the photos above.

See our post Reasons Why Ductwork Fails and How to Avoid Them to gain an understanding of the mechanisms that damage sheet metal duct.